There are several ways to enter purchased animals into your FarmWizard herd account as a batch.
Scanning the bar code on the cattle passports
The quickest and most accurate method is to use a bar code reader to scan the bar code at the bottom on the cattle passport document. This bar code contains the following information:
•Government ear tag number
•Sex
•Date of birth
•Breed
To scan a batch of passports into your FarmWizard account, proceed as follows
1.Group the passport documents by supplier and arrival date. This will form a single scanning batch
2.Go the Herd Manager main menu and click Scan Passports under the BCMS Interface sub menu
3.Check that the Movement Type is set to "On"
4.Select the source premises that the animals originated from. If the premises name is not in the list, select "Other, enter value >" in the drop down and type the new name into the text box to the right

5.If you want to record additional animal details, tick Record Price/Weight/Sire and optionally enter default values for Batch Number (for your own internal farm system), Haulage Cost and Price. These default values will be applied to each animal record in the purchase details grid.
6.Set the Movement Date as the date that the animals moved onto your holding
7.If you want to notify the movements to the Government database, tick the Record with BCMS/APHIS box
8.Click your mouse pointer within the large Scanned Animals text box so that the cursor is flashing
9.Scan the bar code at the bottom of each BCMS passport document. The detail from each passport will display as a single line within the text box. You can scan up to 100 passports in one batch
10. Click the the Record Movement button. If have ticked the box to record additional animal details, a data grid will display with one row for each animal scanned (shown below). The available details are management tag number (FB), Sire name, Price, Weight, Entry Grade, an internal farm Batch Number and Haulage Cost (use the default value set in Step 5)
Note: these details can be entered or amended later if required.
If you do not tick the box to record additional animal details, the new animal IDs will be directly saved to your FarmWizard account
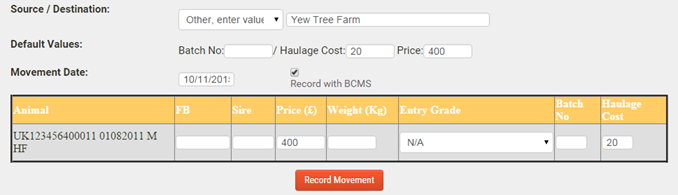
11.If you do not tick the box to record additional animal details, the new animal IDs will be directly saved to your FarmWizard account
12. If you have chosen to enter additional animal data and have entered this information, click Record Movement. This will save all the animal details into your FarmWizard account.
After saving a scanned batch of passports with the Register option ticked, the list of "On" movements will display as pending on the Registrations screen under Herd Management > BCMS Interface. You can now leave the system to notify automatically the next day, or you can click the Register Outstanding Moves Now button to send the movements immediately
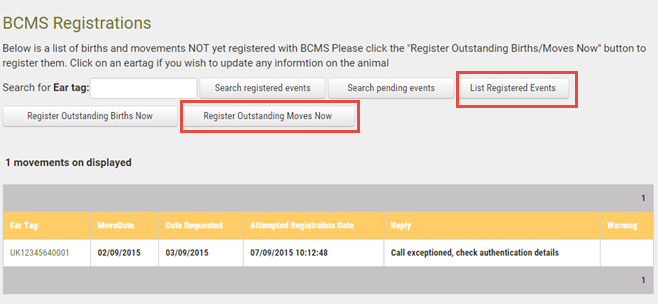
13. Be sure to log into your FarmWizard account within a day of sending the movement to check that all the information has been accepted by the Government database. You can view a list of previously registered events by clicking List Registered Events under Herd Manager > BCMS Interface > Registrations
Uploading from a CSV data file
It is possible to upload new animals via a comma separated value file (CSV). A CSV file can easily be created from a spreadsheet where animal identities are stored one per row with the columns containing a single piece of data about the animal e.g. ear tag, date of birth, breed, etc. To save a spreadsheet (e.g. Microsoft Excel .xls or xlsx) go to File > Save As... in the spreadsheet software and select the CSV file type
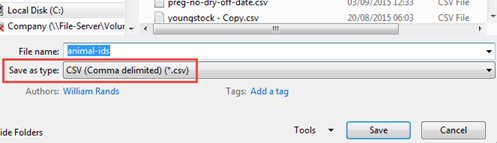
The order of the columns on the spreadsheet must conform to the Full Animal List import schema under the Herd Manager main menu. To import the data proceed as follows:
1.Go to the Herd Manager main menu and click on the Data Import sub menu
2.Check that the order of the columns in your CSV file match the column order for the Full Animal List import type. The mandatory data columns are as follows (and are marked with an asterisk on the FarmWizard screen)
Official Ear Tag, Date of Birth, Herd Join Date, Govt Breed Code, Sex (M/F)
3.Select the Full Animal List import type
4.Browse to the location for the CSV file on your computer and click Import Selected Data to run the import

5.The system will show a list the successfully imported animal identities
